


S T E P 1
1.1 Assess INVENTORY Readiness
The INVENTORY Readiness Assessment is designed to help your community determine whether you’re ready to revise your current inventory management and referral processes.
The assessment asks questions related to:
- Project goals
- Project management capacity
- Current workflows
- HMIS utilization
- Reporting

S T E P 2
1.2 Define Goals & Impact
Whether your community wants to create real-time visibility into housing and shelter bed availability, develop a unit-level matching process, or track timelines and reasons units are taken offline, your pre-project planning should include identifying your desired impact. These goals will be incorporated into your project plan and revisited throughout the project to ensure the desired results are being achieved.
Ask yourself questions like:
- What are the goals for this effort?
- Define a clear use case for using Clarity INVENTORY.
- Is there a gap in your current inventory management process that INVENTORY will fill?
As you identify goals, seek input from a range of stakeholders, especially staff involved in the day-to-day work with housing inventory, coordinated entry staff, and those who determine reporting requirements.

S T E P 3
1.3 Identify the INVENTORY Workgroup
Before you begin implementing Clarity INVENTORY, it’s important to establish a workgroup to oversee the project and manage the rollout. Clarity INVENTORY projects can span several months, so it’s important to consider capacity and level of involvement when selecting stakeholders. We recommend including system administrators, leadership staff, funders, and involving community stakeholders as needed.
|
STAKEHOLDER |
VALUE PROVIDED |
INVOLVEMENT |
|
CoC Representatives |
Ensure Clarity INVENTORY is well integrated into the community’s homeless response system. |
Attend weekly project meetings |
|
HMIS System Administrator |
Understand HMIS software and Clarity INVENTORY and can provide insight into potential workflows and data collection. |
Attend weekly project meetings |
|
Funders/Contract Monitors |
Knowledge of housing/shelter portfolios and program requirements. |
Attend weekly project meetings |
|
Housing/Shelter Providers |
Understand workflows for programs and have knowledge of each program’s bed and unit information. |
Involved in data collection and offer opinions on recommendations presented by the workgroup |
|
Coordinated Entry Staff |
Knowledge of the current coordinated entry matchmaking practices. |
Attend weekly project meetings |

S T E P 4
1.4 Define Roles and Responsibilities
Now that you have established your workgroup and stakeholder involvement, it’s important to define roles and responsibilities to ensure tasks are completed and successful management of the project.
|
ROLE |
RESPONSIBILITY |
|
Project Management |
Coordinates the entire lifecycle of the project from planning to rollout, leads communication with the project team, ensures project deliverables are completed. |
|
Communication |
Plans and completes all project communication to stakeholders outside of the project workgroup to inform them of project goals, timelines, and other key information. |
|
Data Collection |
Oversees the data collection of site, building, unit configuration, unit, and bed information from all service providers and/or property managers. |
|
INVENTORY Configuration |
Configures all components of Clarity INVENTORY in the community’s live and training instances (if applicable) |
|
Unit/Bed Assignment Configuration |
Oversees the completion of initial client unit/bed assignments once Clarity INVENTORY is created. |
|
Report Development |
Drafts report specifications and develops reporting tools to monitor system performance and data accuracy. |
|
Training Content Development |
Develops training materials which may include slides, job aids, and workflow diagrams. |
|
Training Facilitation |
Conducts training for staff impacted by workflow changes. |

S T E P 5
1.5 Build Clarity INVENTORY Knowledge
Building Clarity INVENTORY knowledge among members of the workgroup and involved stakeholders will be critical to the success of the project. Understanding the module will inform decisions about workflows, how to build out Clarity INVENTORY, and how to integrate INVENTORY into your homeless response system.
We can provide a thorough overview, offer insight into how other communities are using Clarity INVENTORY, and answer questions you may have about specifics for your community.
B) Dig into our Help Center ContentStart with the following articles from our Clarity Human Services: INVENTORY section of the Help Center. Continue to read additional articles once you’ve started to build foundational knowledge.
- INVENTORY Overview
- INVENTORY Setup Best Practices
- INVENTORY Dashboard
- INVENTORY Screen
- INVENTORY: Sites
- INVENTORY: Buildings
- INVENTORY: Unit Configuration Type
- INVENTORY: Units
- INVENTORY: Beds
- Unit Queue
C) Watch the INVENTORY Overview video.
D) Explore INVENTORY in your training instance, if your community has one.
You’re free to start exploring Clarity INVENTORY at any time. Use the Help Center articles above to help you practice setting up your INVENTORY configuration, assigning clients to units, making referrals, and exploring the INVENTORY Dashboard. We strongly recommend you only practice in your training instance. Configuration should not be completed in your live instance until you’re 100% confident you have it correct.

S T E P 1
2.1 Understand your Housing and Shelter Portfolio
Understanding your housing and shelter portfolio will impact the configuration decisions made for INVENTORY.
Ask questions such as:
- Do we have any scattered site housing? Scattered site housing may not have a specific site or building where clients reside. In these circumstances, communities should consider using Standalone Units as a configuration option.
- Do we have any buildings that house more than one program? INVENTORY provides many configuration options which includes the ability to set up multiple buildings under one site or connect the units within one building to multiple programs. Identifying these buildings will help you make informed configuration decisions.
- Do we have programs with multiple funding sources? Do these programs need to generate reporting data broken out by funding source? Funding sources can be connected to various layers of INVENTORY. Identifying funding sources early, can help you determine if funding sources need to be connected to any layer other than programs.

S T E P 2
2.2 Assess the Use of Clarity Functionality
Some Clarity functionality interacts with INVENTORY in particular ways that may impact configuration and other workflows. Understanding what Clarity functionality your community uses is critical to your planning and project success. System administrators should review the following functionality:
|
CLARITY FUNCTIONALITY |
IMPACT |
CONSIDERATIONS |
|
Availability Form/Limited Availability |
When the Bed & Unit Management toggle is enabled for specific programs, it disables the ability to post program openings using the Availability Form. |
This is a program-level setting that can be enabled on a program-by-program basis. When programs are ready to transition to INVENTORY, they will need to stop using the Availability Form once the Bed & Unit Management toggle is enabled. |
|
Program or Funding-Level Eligibility Criteria |
If program or funding-level eligibility criteria is already configured, it should be incorporated into your INVENTORY build-out. |
Programs can be assigned to Sites, Buildings, Unit Configurations, and Units. This flexibility allows you to connect your established eligibility criteria to INVENTORY. |
|
Community Queues |
Community queues are connected to various Clarity INVENTORY functionality and may need to be incorporated into workflows. |
INVENTORY does provide the options to connect clients to units without a referral. For communities looking to use a referral workflow, clients must be on a Community Queue in order to be referred to a particular unit or bed using INVENTORY. |
|
Available Users License |
Additional user licenses may be needed to provide users access to specific Clarity INVENTORY functionality. |
Users provided manage access to INVENTORY will require an access role using a system administrator or manager’s license. Communities should determine who needs this level of access and purchase additional licenses, if needed. |

S T E P 3
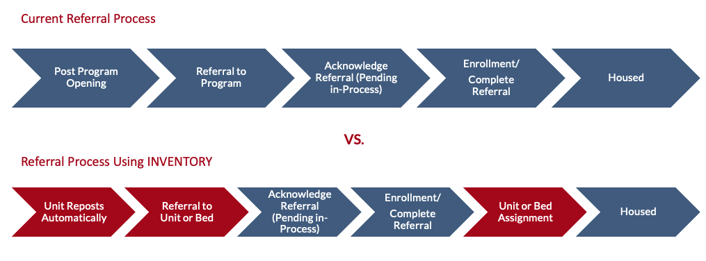
2.3 Understand Current Referral Processes
Current referral processes will likely impact the design of a new INVENTORY workflow. We recommend including current coordinated entry matchmaker staff in workflow discussions to ensure your new Clarity INVENTORY workflows align with current practices and results in minimal disruptions to existing processes.

S T E P 4
2.4 Analyze Current Data
To get the most out of Clarity INVENTORY, client occupancy and unit information must stay up to date in order to provide real-time information. When preparing to implement Clarity INVENTORY, it’s important to evaluate current referral and program roster data quality.
Here are some suggested data quality checks. We encourage communities to develop a data clean-up plan to address data inaccuracies prior to rolling out Clarity INVENTORY.
|
REPORT |
DATA QUALITY CHECK |
CORRECTIVE ACTION |
|
[GNRL-106] Program Roster Report |
Run the Program Roster Report for shelter and housing programs. |
Exit clients who are no longer in the program |
|
Update the household composition for any household that is incorrect on the roster. |
||
|
[RFRL-103] Referral Statistics Inbound Report |
Run the Referral Statistics Report and review all pending and pending in-process referrals. |
Update the status or complete any referrals where the status is incorrect or has changed. |
|
Custom Report |
Query program bed, unit, and household type information. |
Update any information that is incorrect or out-of-date. |
|
Custom Report |
Query administrative site information. |
Update any site addresses that are out of date. |

S T E P 5
2.5 Review Reporting Tools
Successful program or system oversight should include a robust reporting toolkit. Communities should review existing reports and identify which ones will be impacted by changes to your referral processes and bed and unit management.
You will also want to familiarize yourself with the Clarity Human Services’ Report Library, which includes reports containing bed and unit information. Custom reports may also be needed to fill any gaps in your current reporting toolkit.
Some potential reporting tools to review include:
- Referral Timelines
- Referral Outcomes
- Bed And Unit Availability
- Occupancy Reports Including Specific Unit Information
New reports to consider:
- Open Unit Report
- Unit Status by Building
- Offline Unit/Unit Turnover Information
- Occupancy information with detailed client information

S T E P 1
3.1 Establishing a List of Projects
Clarity INVENTORY can be used with a variety of project types. Communities need to establish what projects will benefit from the use of Clarity INVENTORY and what projects should continue to use program-level bed and unit information.
Projects to include:
- Permanent housing programs and entry/exit emergency shelter programs- INVENTORY can be used to manage unit and bed availability and occupancy information.
- RRH/Voucher programs- the flexibility of INVENTORY allows communities to track program openings or slots.
- HMIS Participating programs- These programs typically enter data into HMIS and keep referral and unit occupancy information up-to-date
We have highlighted several projects that communities should consider excluding for the following reasons:
- Safe parking programs- These programs should be categorized as street outreach projects, not emergency shelters.
- Emergency Housing Voucher programs (EHV)- These programs may be ending in the near future due to the discontinuation of funding so it may not make sense to include them.
- Non-participating programs- These programs do not typically enter data into HMIS and thus would not be able to keep referral and unit occupancy information up-to-date
- Domestic Violence programs- These are usually non-participating programs and/or data may be captured in a comparable database.

S T E P 2
3.2 Determining Manual or Migration Configuration
Clarity INVENTORY allows for customization and granularity through the use of Sites, Buildings, Unit Configuration Types, Units, Bed, and custom fields. Due to the level of detail, initial configuration can become quite time consuming. Communities who don’t have the capacity to complete manual configuration can work with Bitfocus to have all components of Clarity INVENTORY created through a custom data migration.
|
MANUAL CONFIGURATION |
MIGRATION |
|
Recommended for a few hundred units or beds |
Recommended for over 1000 units or beds |
|
Complete at your own pace |
Saves time when creating thousands of units or beds |
|
Can be more time consuming |
Have to prepare a perfect data file that’s used for the migration |
|
Risk of errors due to manual entry |
Accuracy is guaranteed if file is correct |
Please reach out to your BFF or your Community Administration contact if you’d like to explore an INVENTORY migration.

S T E P 3
3.3 Designing Workflows
Now that you’ve completed your current state analysis and decided on the projects that will utilize Clarity INVENTORY, it’s time to design your INVENTORY workflow. Asking yourself some of these questions will help you determine how INVENTORY can fit into or enhance your existing workflows.
Ask questions such as:
- Do you make referrals to housing or shelter programs using direct referrals or the Community Queue?
- Do you have programs that house or shelter clients but do not take referrals from coordinated entry?
- Will you utilize program or funding-level eligibility that’s configured as part of the matching process?
- Who will be responsible for changing Unit Configuration Types?
- Who will be responsible for updating a unit’s status?

S T E P 4
3.4 Deciding on INVENTORY Settings
Clarity INVENTORY has a variety of settings that impact system-level functionality, reporting, automation, and access. The Clarity INVENTORY Decision-Making Guide outlines the settings that are available and what they control. Following the decision-making guide will ensure you discuss all critical settings and allow you to track your progress along the way.

S T E P 5
3.5 Staff INVENTORY Access
As you get closer to going live, start thinking about the level of INVENTORY access staff will need to complete their work. This may require updating existing access roles or creating new ones. In general, access to the components of Clarity INVENTORY fall into five categories.
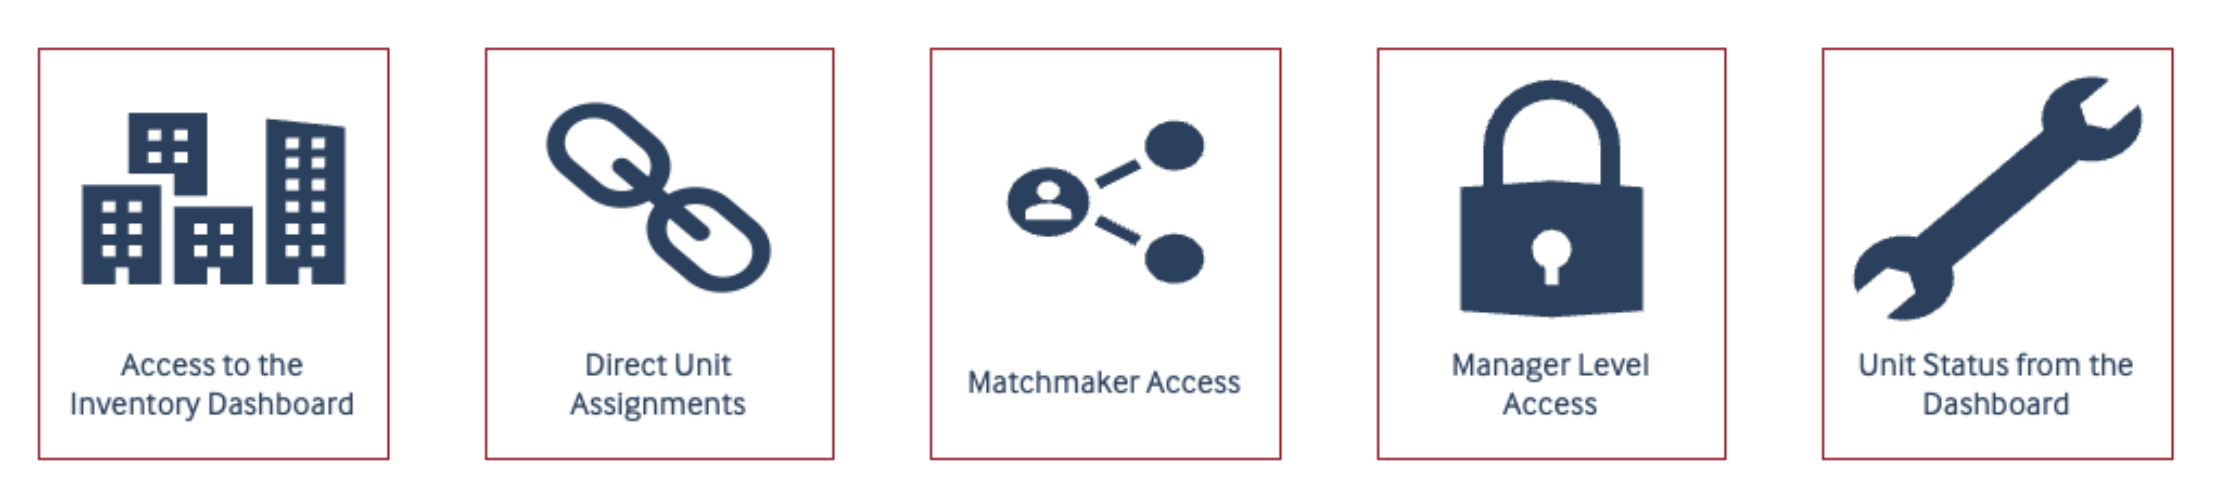
The Rights Glossary for Access Roles will help you familiarize yourself with the various new access role permissions and what each one controls. After reviewing the glossary, begin mapping out changes to access roles. The Clarity INVENTORY Access Role Mapping template includes sample access roles permissions and a sample access role mapping template.

S T E P 1
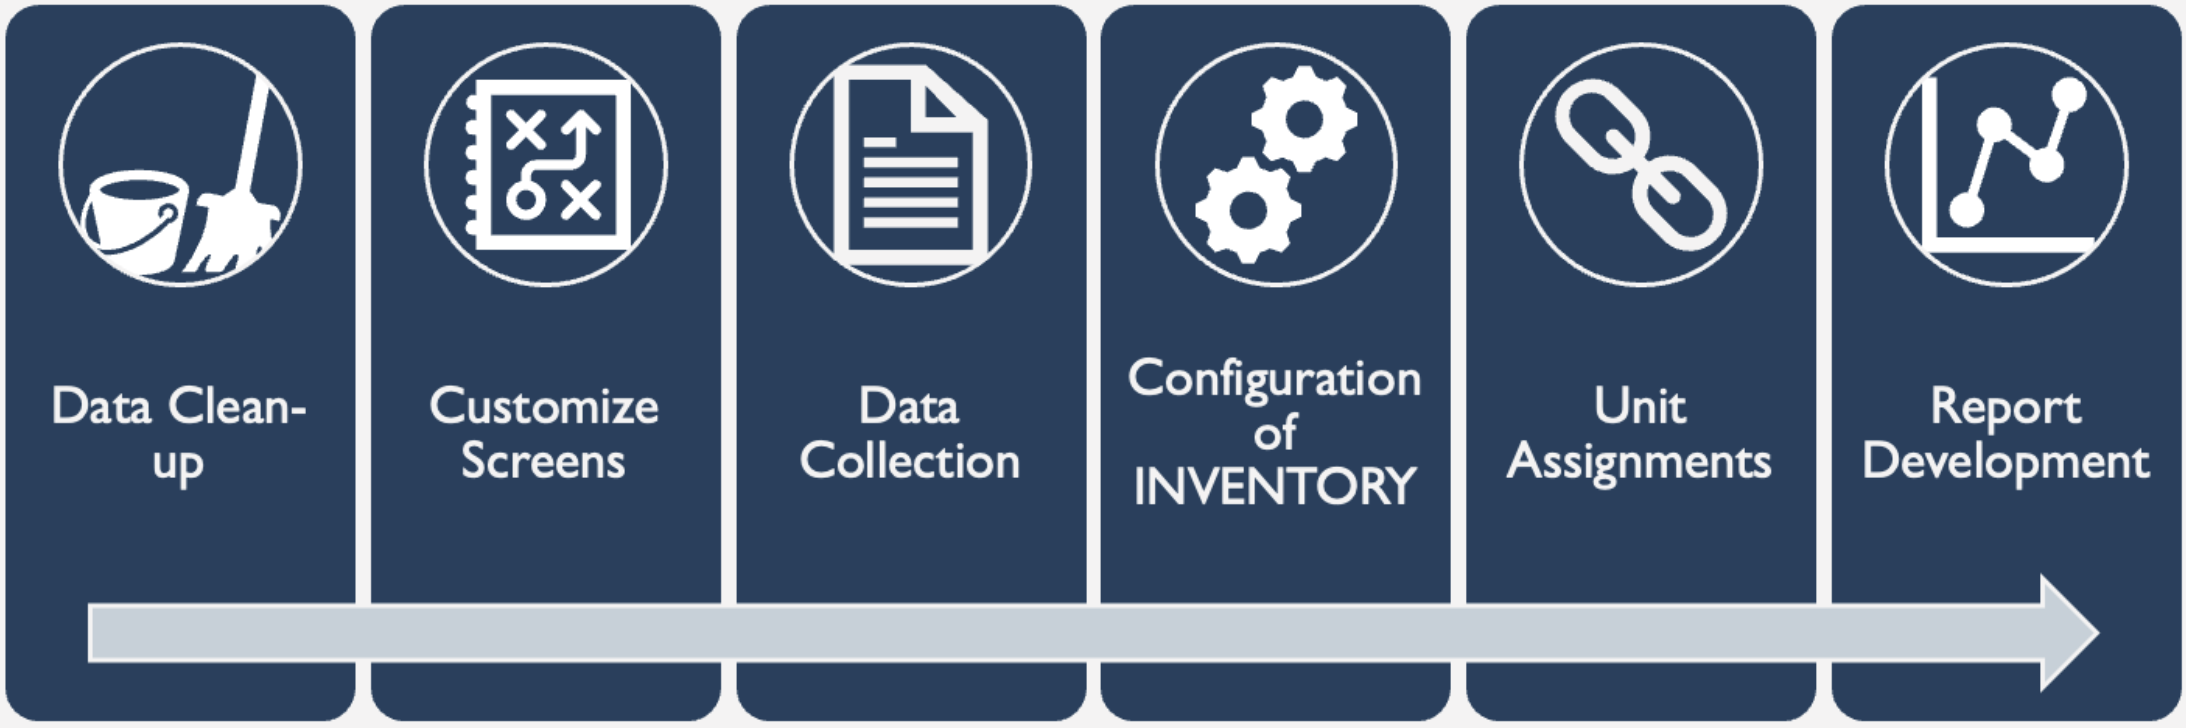
4.1 Data Clean-Up
Once Clarity INVENTORY is configured, you will begin connecting clients to units and beds and indicate the status of each unit. Having up-to-date data will allow INVENTORY to reflect real-time information at the time of your rollout. Work with your providers to update any referral and program roster data that may be incorrect.

S T E P 2
4.2 Customizing Screens
Clarity INVENTORY includes its own set of screens called Housing INVENTORY Screens. These screens can be customized to meet your community’s specific needs, allowing you to track information about your housing stock to create a more refined matchmaking process.
Because Housing INVENTORY screens are system-level screens, if your instance of Clarity includes multiple continuum of cares (CoCs), we recommend consulting with the other CoCs before making any changes.
For the smoothest data collection process, custom fields should be finalized before data collection begins. The table below lists examples of custom fields for each screen type.
|
SITE SCREEN |
BUILDING SCREEN |
UNIT CONFIGURATION SCREEN |
UNIT SCREEN |
BED SCREEN |
|
Non-Smoking Campus |
Elevator in Building |
Referral Source |
Private Bathroom in Unit |
Lower Bunk |
|
24-Hour Staffing |
Free laundry |
ADA Unit |
Shared Bathroom |
Upper Bunk |
|
On-Site Behavioral Health Services |
Wi-Fi in the Building |
Funding Sources |
ADA Unit |
Bariatric Bed |

S T E P 3
4.3 Data Collection
Now that you’ve finalized your custom fields for the Housing INVENTORY Screens, you’re ready to start the data collection process. Data collection will require a significant amount of staff time and attention to detail. This involves collaborating with housing providers to collect detailed information about each project included in the project list you created in section 3.1.
In addition to the custom fields identified in the previous phase, data collection should also include the core Housing INVENTORY fields as well. We recommend reviewing this sample data collection template.

S T E P 4
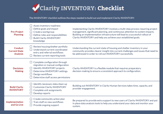
4.4 Configuration
If your community has decided to complete your Clarity INVENTORY configuration manually, the INVENTORY Configuration Checklist and the INVENTORY Decision Making Guide you completed earlier will help guide you through the steps.

S T E P 5
4.5 Unit Assignments
Once the components on INVENTORY (Sites, Buildings, Unit Configuration Types, Units, and Beds) have been configured, you should begin assigning the current clients to the unit or bed they’re residing in. Similar to INVENTORY configuration, if your community doesn’t have the capacity to complete manual unit assignments, Bitfocus can create the unit or bed assignments through a custom migration.
Please reach out to your BFF or your Community Administration contact if you’d like to explore an INVENTORY migration.

S T E P 6
4.6 Report Development
Now it’s time to build reporting tools to support staff using INVENTORY and for program and system oversight. Clarity Human Services provides robust data analysis tools, including the new INVENTORY model, that you can use to dig into your INVENTORY data. There are many possible uses for your INVENTORY data, some of which may overlap with other existing analyses, so start thinking about the stories you want to tell and where you have gaps in your existing tools.
Here are some reporting examples:
Unit Availability- compile data to provide matchmakers with a snapshot of current unit availability. You may want to look at:
- Available units; including details and filters so matchmakers can review unit attribute information
- Counts of units by each status, including breakdowns by building or agency to provide a high-level oversight of system capacity
System Functionality Monitoring- compile data to confirm workflows are occurring successfully and INVENTORY is being used properly. You may want to look at:
- Timeliness of exits from programs/units
- Offline and inactive units to confirm accuracy
- Length of time units are offline (turnover rates)
Outcomes/Timelines- Compile data to understand how well the system is performing. You may want to look at:
- Number of successful referral outcomes
- Number of unsuccessful referrals/reason for denials
- Length of time from assessment to referral
- Length of time from referral to move-in

S T E P 1
5.1 Communication
Communication is a key element of any successful project implementation. When creating a communication plan first consider all of the stakeholders who need information about the impending changes. Communication should be catered to the needs of each stakeholder group.
Here are a few examples; check out our sample Communication Plan for more:
All stakeholders:
- Initial announcement about the project and pending transition
- High-level status updates throughout the project
Housing/Shelter Providers:
- Initial announcement about involvement in the data collection process
- Meeting to review the data collection requirements
Matchmakers:
- Training announcements
- Go-live prep announcement
Your communication plan should include a communication schedule. We recommend scheduling your first communication as the project kicks-off with follow up communication every 2-3 months. Communication should increase as you approach implementation.

S T E P 2
5.2 Training & Office Hours
Training community providers requires significant preparation to ensure the training content is well thought out and caters to different learning styles. Ideally, training should occur as close as possible to go-live so staff can put their new knowledge into practice right away.
During your training process, we recommend a few best practices:
- Divide training and content by user workflow (i.e., the matchmaker and housing provider workflows should be separate training sessions)
- Provide a hands-on experience that allows users to explore the new workflow directly
- Provide a job-aid (digital or paper) that reminds users of the steps from a high-level
- Make sure users are clear on where to find resources (such as the Clarity Help Center)
- Make sure users understand how to get support and what kind of responsiveness they can expect
Once you go live with Clarity INVENTORY, plan office hours 2-3 weeks after go-live. This allows you to reinforce details that users may have overlooked and provide additional support to users as they become familiar with their new workflow. We recommend scheduling office hours monthly or until the data quality shows that office hours are no longer necessary.
Lastly, conduct regular refresher training or provide recorded videos to support existing users and as a way to train new staff coming on board.


S T E P 4
5.4 Oversight
Now that INVENTORY is up and running, begin using the reporting toolkit you put together in section 2.5 to monitor program and system performance. This oversight will provide helpful insights to ensure goals and outcomes are being met, and the system is functioning as expected. Clarity INVENTORY relies on data quality and timeliness to be successful. Use the data to identify successes, areas of improvement, and what to do next.